
25 April 2024
Introduction: Rediscovering Vinyl - A Richer Musical Experience
Everybody's playing records again . . . sorry, vinyls. Is it because they're better, cooler, fun, more expensive?
Maybe easy access to 100 million streamed tracks has shallow-fried our experience with music. You ponder what to play next, hear two songs while searching for another, or you're not listening, and the experience doesn't cut it. Put on a record, and you'll listen to the whole side.
But when the digital audio quality is so good, why are so many turning to vinyl now? Can dragging a needle across a plastic disc really sound better?
While high-res digital audio delivers clarity and punch, spinning discs and dropping the needle into the groove is an event, one that brings us closer to the music – maybe as close as we can get without playing the instruments ourselves.
Concerning sound, asking a veteran mastering engineer, Graeme, from The Exchange Mastering Studios why they think vinyl is better – as if it were all elementary – we are told:
"All recorded sound is distorted. It's just that analogue distortion is more pleasant [to hear] than digital distortion. Our ears are sensitive to those nuances."
The fact is that a turntable stylus picking up music from the bumps and waves in the groove is a physical action – like sound itself – its analogue. It's dynamic.
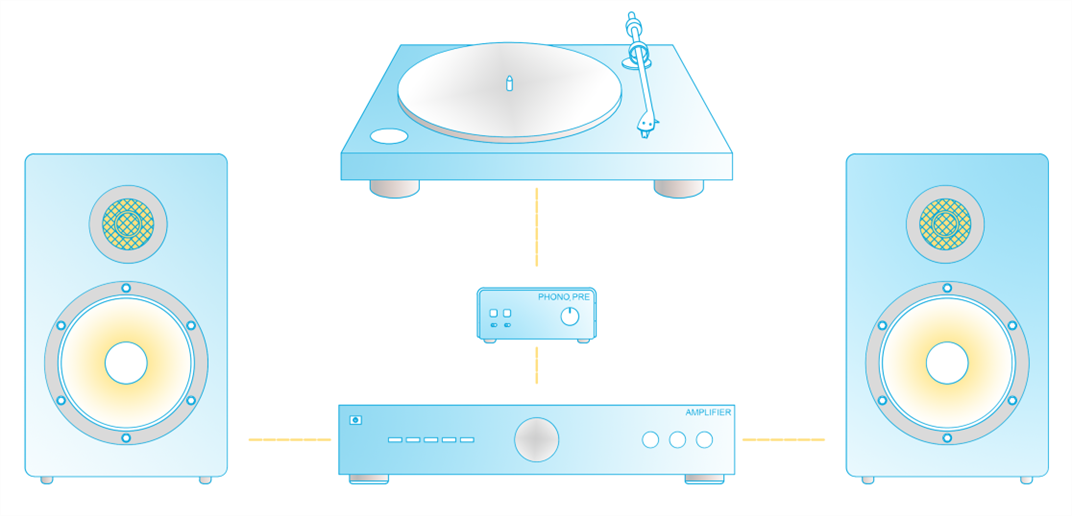
Understanding Turntable Record Player Components: The Essentials - Part 1
Getting the best from the vinyl experience means analogue. So our guide walks you through a traditional path from the record to the speaker – no laptops, WiFi or DACs – just pure audio.
Step-by-Step Connection Guide on How to Set Up a Turntable Record Player: From Plugging In to Play:
- Turntable - The centrepiece of all great music systems!
- Phono preamp - The turntable's low output signal needs amplifying to LINE level before reaching the power amplifier's input.
- Amplifier - Some amplifiers already have a phono preamp. The power amplifier boosts the LINE level signal from the preamp before reaching the speakers.
- Speakers - Pairing a good set of speakers with your amplifier is how you personalise your sound.
- Cables - Maintain the audio-signal quality with a decent set of RCA cables and speaker wires.
a) Connecting with a Phono Preamp
- Your turntable should include a pair of left/right RCA cables and a ground wire if it is not internally grounded. Connect these to the preamp as illustrated.
- Using another pair of RCA cables, connect the preamp to a LINE input on your amplifier.
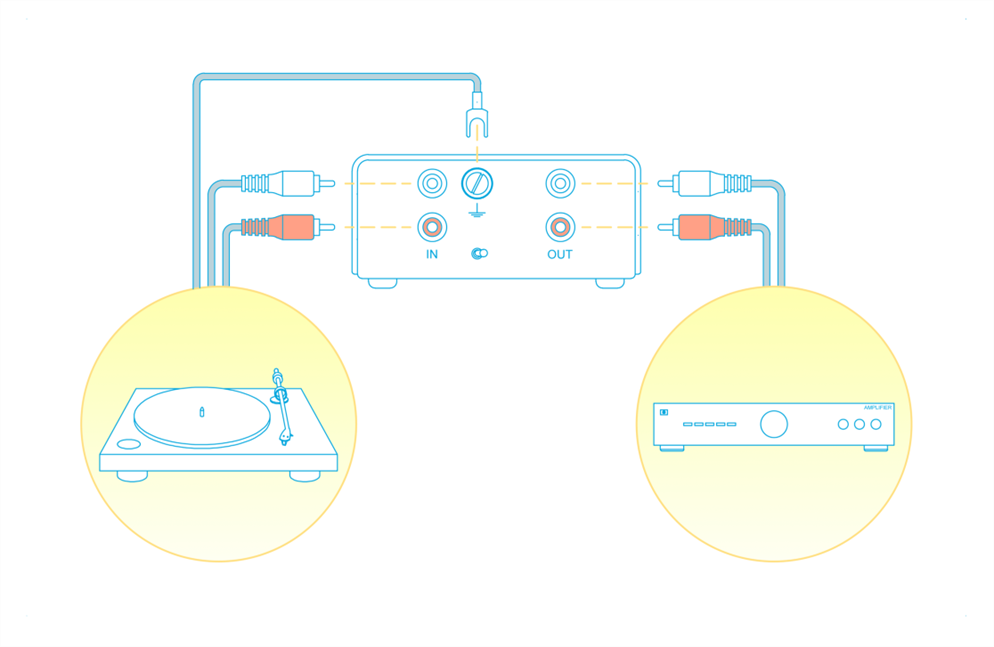
b) Direct Connection to an Amplifier with a built-in Phono Preamp
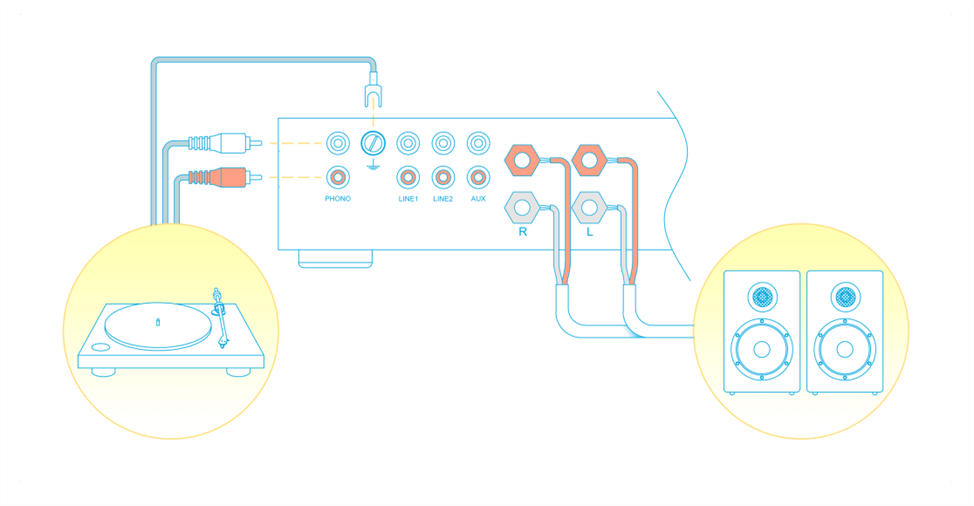
- If your amplifier is equipped with a phono preamp, simply connect your turntable to the PHONO input on your amplifier.
- Connect the amplifier to a set of suitable speakers.
Advanced Turntable Setup: Fine-Tuning for Audio Perfection - Part 2
Now we've established that you ought to be playing music on a turntable and possess the know-how for setting it up and maintaining the beautiful thing. It may not be as easy as downloading an app and creating a login, but landing an aircraft it ain't.
Most turntables have much of what follows already set up by the manufacturer. But there will come a time when you'll fancy upgrading and need to make adjustments for yourself.
The following instructions will guide you simply through all the essential steps to get the best from your instrument.
1. Optimising Performance: Precise Adjustments for Perfect Playback
Fitting a new cartridge
At some point, you'll need to fit your turntable with a new cartridge - either as a replacement or an upgrade.
What you need
- Cartridge nuts/bolts (supplied with new cartridges)
- Precision screwdriver or Allen key (depending on bolt head)
- Pointed tweezers
- Cartridge protractor
- Magnifying glass - to help see more precisely.
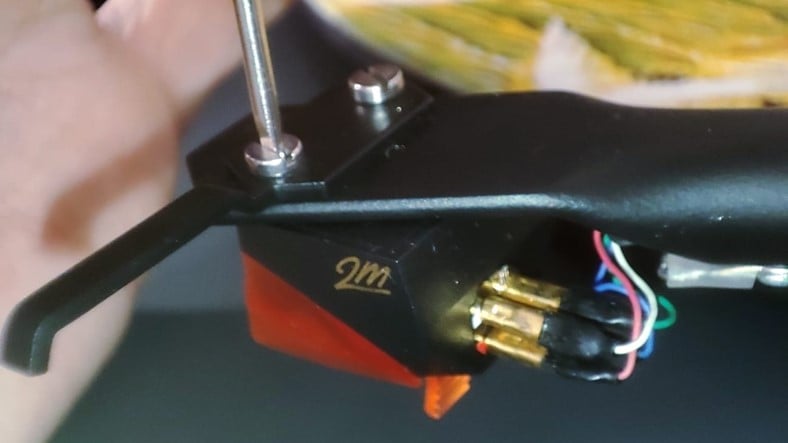
Connect the cartridge to the headshell.
This simple but frustrating procedure needs a little concentration. Even after a dozen times, this job will challenge your patience! So put your turntable on a desk and pull up a comfy chair.
- Before attaching the cartridge to the headshell itself, connect the four coloured wires attached to the headshell to the new cartridge.
- Using the tweezers (and this is the trickiest part), slide the connectors over the correct terminal – super carefully, starting with the connector furthest from you. The colour convention for stereo cartridges is as follows:
- Red – Right channel positive
- White – Left channel positive
- Green – Right channel negative
- Blue – Left channel negative
[Make sure you check which terminal takes which colour wire.]
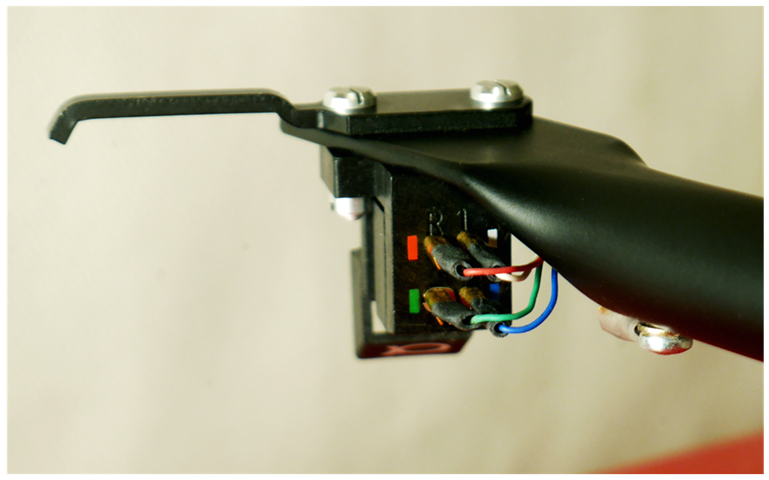
Attach the cartridge to the headshell.
One more tricky job to get through - you just need to screw the cartridge back onto the headshell.
- First put one of the supplied bolts through the headshell and the cartridge. Some are designed to go downwards, others upwards or 'verso').
- Using the tweezers, persist in threading one of the supplied nuts to the end of the bolt.
- Screw the nut just enough to fix the cartridge against the headshell so it can still slide along the slots.
- Thread the other nut onto the second bolt.
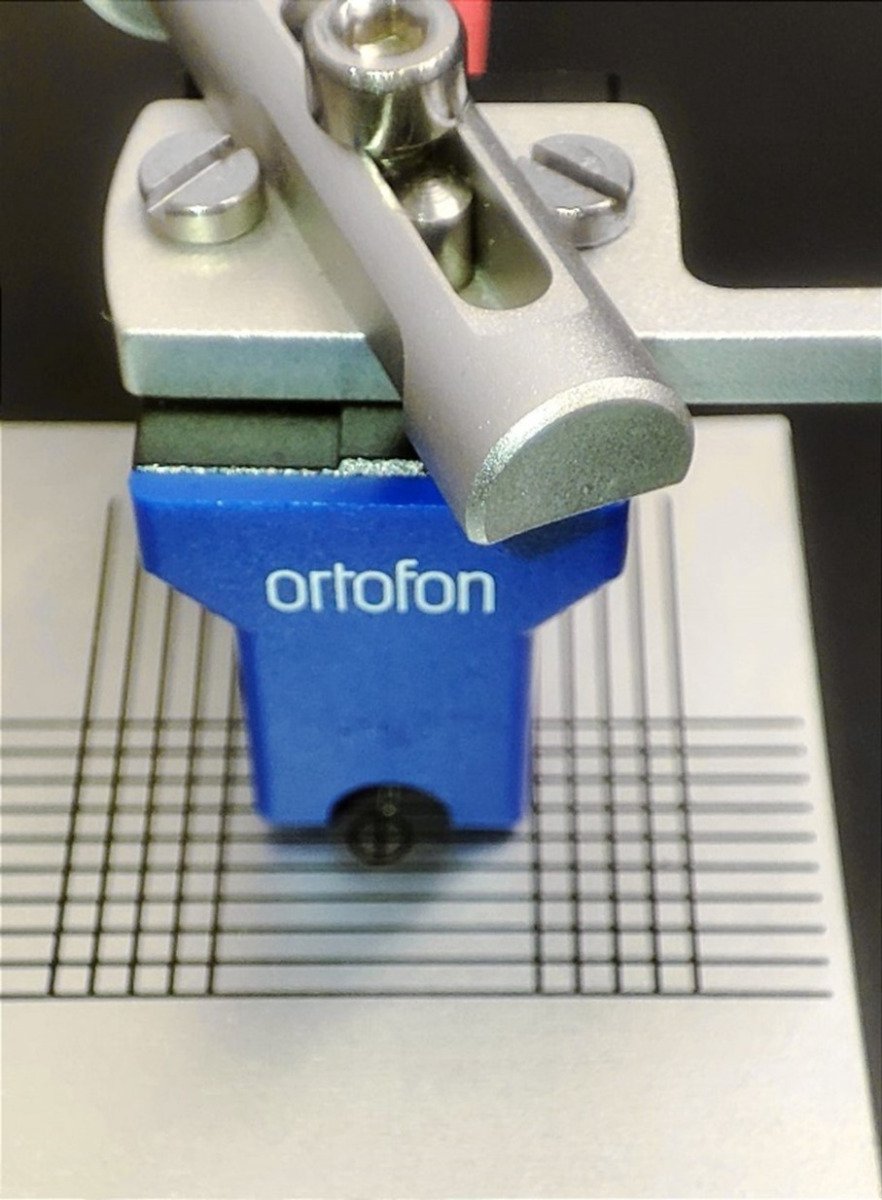
Align the cartridge
The cartridge needs to be fixed squarely in place at two points over the platter. Get this right – it's important.
- Place the protractor flat on the platter using the turntable's spindle to keep it in place. The printed grid is what you will squarely align the cartridge with.
- Slide the cartridge along the slots until its front edge is parallel with the grid lines and the stylus tip is on the protractor's crosshair intersection.
- Tighten the nuts, ensuring the aligned cartridge does not move.
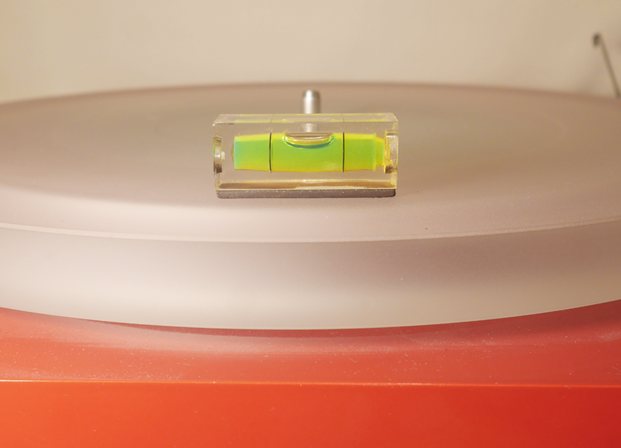
Balance the tonearm – Vertical Tracking Force (VTF)
Even a brand-new turntable with a pre-aligned cartridge will need to have its tonearm balanced. This adds the correct downward force of the stylus onto the record.
What you need
- Small spirit level (Or use a free phone app)
- Stylus gauge (optional)
- Your cartridge's tracking force (found on the cartridge's specs.) Firstly, using the spirit level, make the turntable level by turning each adjustable foot.
! Firstly, using the spirit level, make the turntable level, either turning each adjustable foot or finding a way to level the surface on which your turntable is placed.
Method 1 - With a gauge
Ideally, if you splashed cash on a high-quality cartridge, you should use a gauge to get this done.
- Place the gauge on your levelled platter and calibrate it (unless already calibrated).
- Position the gauge so the stylus tip can be lowered onto the gauge's centre spot.
- Check your cartridge's specifications to find out its VTF range. It is preferable to lean toward the higher value of the range.
- The gauge will likely read the weight in grams, while cartridge specifications will likely give force in mN (millinewtons). For example, if the VTF is given as 15mN, weigh the cartridge at 1.5g by moving the counterweight along the arm-tube.
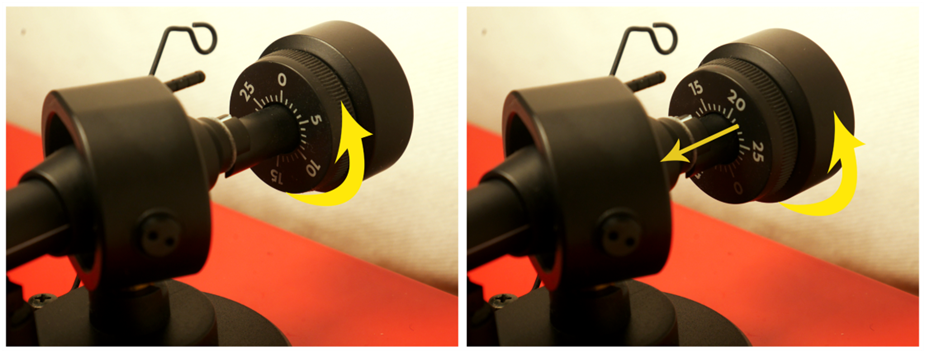
Method 2 - Without a gauge
If the counterweight has a scale, you can get this pretty close to perfect. If not, it's sheer guesswork – get hold of a gauge.
- Remove the cover from the stylus, if it has one, to work with its actual weight for balancing.
- Move the arm so it hangs in the space between the arm holder and the platter.
- Slide or twist the counterweight onto the rear end of the arm until the arm floats horizontally.
- If your counterweight has a scale, hold the weight in place, but rotate the scale so that '0' is in line with the marker on the top of the arm.
- Check your cartridge's specifications to find out the VTF. It is preferable to use the higher value of the range. For example, if the VTF given is 15-18 mN, rotate the counterweight until 18 is in line with the marker (or 1.8 if your scale is in grams).
2. Perfecting Tonearm Adjustments: VTA and Azimuth Settings
Vertical Tracking Angle (VTA)
Normally, there's little concern with this. Some turntables are equipped with a means of adjusting the VTA to ensure the stylus is parallel with the record's surface. The arm should be parallel with the record.
What you need
- Stiff card printed with horizontal lines. Simply stick a sheet of lined paper squarely to a piece of card.
- Allen key
1. Put a record on the platter and lower the stylus onto the record.
2. Place the lined card on the platter behind the tonearm.
3. Find the adjustment screw (usually at the base of the tonearm's support column). Using the Allen key, slightly loosen the screw.
4. Raise or lower the column until the underside of the cartridge is parallel with the record's surface and the arm is parallel with the card's printed lines, then tighten the screw. For best results, listen to the audio and compare results after making small adjustments.
[Different thicknesses of record vinyl will result in slightly different angles, thereby affecting the sound of the various records.]
Adjusting Azimuth
The azimuth angle is corrected by rotating the arm-tube. The stylus needle must be perpendicular to the platter at a 90° angle. This ensures the stylus tip makes equal contact with either side of the record's groove.
What you need
- Allen key
- Set-square
1. At the rear end of the tonearm, locate the grub screw that holds the arm-tube in place.
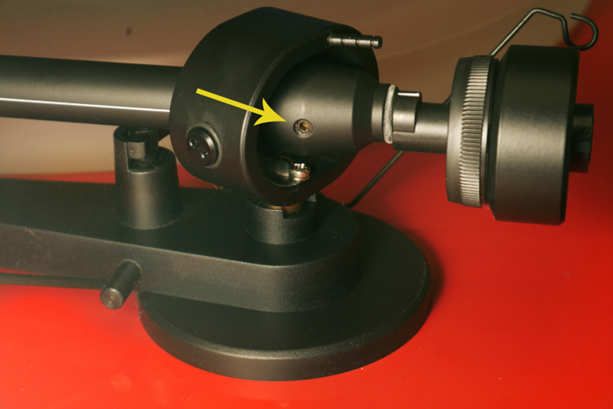
2. Using the Allen key, slightly loosen the screw.
3. Looking at the cartridge head-on, place the set-square on the platter next to it and twist the arm-tube so that the stylus needle is perpendicular to the platter.
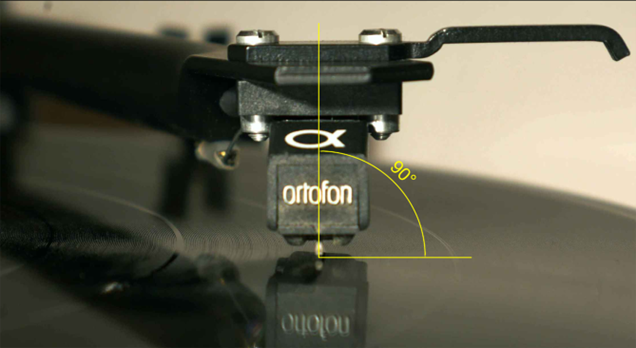
4. Re-tighten the grub screw.
3. The Final Touch: Adjusting Anti-Skate for Balanced Playback
Often ignored, this setting keeps the stylus from gliding too far inward or outward across the record, but it can never be exact, and there is only one sure way to do this – a blank record.
A grooveless record cannot guide the stylus tip, so it's free to glide wherever the laws of physics want it to. Different decks have different ways to adjust anti-skate. Below are the common ones.
- Put the blank disc on the deck.
- Drop the needle on the surface – halfway into the disc – and see where it glides.
- Anti-skate weight – A small weight hangs on a thread from a bar on the tonearm and over a hook. There are three notches to loop the weight's thread, hang the weight off the notch that holds the arm as close to still as possible.
- Anti-skate dial – Near the tonearm's pivot point is a dial. The dials gauge can be matched with the VTF (see above) which should hold the tonearm from drifting across the blank disc.
- Anti-skate adjustment screw – Under the deck below the tonearm's base is a screw or a knurled grub. This must be turned while the arm is safely at rest. Test the glide of the stylus on the disc. If it still glides, rest the arm again and turn the adjustment screw again.
Conclusion
By carefully setting up and fine-tuning your turntable system, you unlock the true potential of your vinyl records. This guide has walked you through each step—from the basic setup to the precise adjustments needed to optimise audio fidelity. The effort pays off immensely, transforming listening into an engaging, active experience only vinyl can provide. Whether it's the warmth of the sound, the ritual of placing the needle, or the artwork and liner notes, the vinyl experience is unmatched in its sensory appeal and audio richness.
Epilogue: Sustaining Your Sonic Sanctuary
Maintaining your turntable setup is essential for long-lasting enjoyment and performance. Regular maintenance, such as dusting your equipment, checking for wear on the stylus, and ensuring that all components remain properly calibrated, will preserve the pristine quality of your sound. Additionally, handling your vinyl with care—keeping records clean and stored properly—will prevent damage and ensure that each play is as perfect as the first. Embrace these habits to keep your turntable and records in top condition, making every vinyl listening session magical.